Livraison gratuite sur les commandes américaines de 69 $ et plus

    15% OFF Valentines Day

    Use Code:WATTSOFLOVE
    DAYS
    HRS
    MINS
    SECS
    Apprendre encore plus

    Kit de protection complète du corps DIY pour modèle Y

    Protecteur d'écran en verre trempé (9H) pour modèle 3/Y

    Kit complet de suppression de chrome pour les modèles 3, S et X

    Ensemble furtif pour les modèles 3 et Y

    DIY Chrome Delete Kit

    DIY chrome delete kits make it easy for Tesla owners to achieve this look without the need for professional services. These kits provide everything you need to replace chrome trims on door handles, window trims, and mirrors with a streamlined, uniform finish that complements Tesla's futuristic design.

    DIY Chrome Delete Kit

    Filter
    4 produits
     

    Key Takeaways:

    • Achieve a Sleek, Modern Look: DIY chrome delete kits enable car owners to remove chrome accents, replacing them with a clean, matte, or satin finish.
    • Budget-Friendly and Easy to Use: These kits are an affordable and simple way to achieve a professional, polished look at home.
    • Practical Guidance and Tips: Learn application techniques, maintenance best practices, and common mistakes to avoid for a flawless chrome delete.

    What Is A DIY Chrome Delete Kit?

    A DIY chrome delete kit includes pre-cut vinyl pieces and tools for removing or covering chrome accents on your vehicle. Designed for beginners and car enthusiasts alike, these kits provide a straightforward way to replace shiny trims with a matte or satin finish.

    For Tesla owners, chrome delete kits are particularly popular. They enhance the car’s modern, minimalist design while offering additional protection against wear and tear. Whether you’re aiming for a stealthy, monochromatic look or simply want to reduce glare, a DIY chrome delete kit delivers professional-grade results without professional costs.

    Benefits Of A DIY Chrome Delete Kit

    Enhanced Aesthetic Appeal

    Chrome delete kits give your Tesla a sleek, cohesive look by replacing shiny trims with matte or satin finishes that align with its modern design philosophy.

    Cost-Effective

    DIY kits are a fraction of the cost of professional services, allowing you to upgrade your car’s appearance without overspending.

    Easy Installation

    Designed with beginners in mind, these kits include everything you need for a hassle-free application, from pre-cut vinyl to step-by-step guides.

    Reversible Customization

    Not sure you want to commit? Chrome delete kits are non-permanent, meaning you can remove them without damaging your car’s original paint or trim.

    Common Mistakes To Avoid When Using A DIY Chrome Kit

    Applying a DIY chrome kit can be straightforward, but avoiding common pitfalls will save you time and ensure a professional finish. Here are some mistakes to watch out for:

    Skipping The Cleaning Step

    Failing to thoroughly clean the surface before application can lead to poor adhesion. Dirt, grease, or even moisture can cause the chrome strips to peel prematurely or appear uneven.

    Rushing The Process

    Haste often leads to misalignment or air bubbles. Take your time to measure, position, and apply each piece carefully to achieve a smooth, polished look.

    Applying In Extreme Temperatures

    Extreme heat or cold can affect the adhesive's performance. Aim to apply the kit in a controlled environment, ideally at a moderate temperature, to ensure proper adhesion.

    Not Using A Heat Gun For Curved Areas

    Skipping the heat gun step for curved or uneven areas can lead to gaps or lifting edges. Heating the chrome material makes it more pliable and allows it to conform to the car’s contours seamlessly.

    Overstretching The Material

    While positioning the strips, avoid stretching the material excessively. Overstretching can weaken the adhesive and compromise the durability of the application.

    Neglecting To Check Alignment

    Misaligned strips can detract from the overall look. Always step back and assess the placement before pressing the chrome strip down completely.

    TESBROS Chrome Delete Kit

    Why Choose TESBROS Chrome Delete Kit?

    Transforming your Tesla’s appearance has never been easier. TESBROS Chrome Delete Kits are meticulously designed for Tesla models, ensuring a perfect fit and a sleek finish. Here’s what sets them apart:

    Custom Fit For Tesla Models

    Each TESBROS Chrome Delete Kit is precisely cut to fit Tesla models. This ensures a seamless and professional finish without the need for trimming or additional adjustments, saving you time and effort during installation.

    Premium Materials

    Crafted from top-grade vinyl sourced from renowned brands like Avery Dennison and 3M, TESBROS kits are built to last. The high-quality material resists fading, peeling, and cracking, ensuring your Tesla maintains its sleek appearance over time, regardless of weather conditions.

    DIY-Friendly

    Whether you're a DIY enthusiast or a first-timer, TESBROS makes installation straightforward. Each kit comes with pre-cut vinyl pieces tailored to your Tesla, along with essential tools like squeegee applicators for a smooth finish. Detailed step-by-step instructions and access to comprehensive video tutorials provide all the guidance you need for a successful and stress-free installation process.

    Cost-Effective Customization

    Why pay for expensive professional services when you can achieve the same premium look yourself? TESBROS Chrome Delete Kits deliver high-quality results at a fraction of the cost, making it an affordable way to elevate your Tesla’s style.

    Step-By-Step Guide To Applying A DIY Chrome Delete Kit

    Transforming your Tesla with a sleek, modern finish is easier than you might think, especially with TESBROS' expertly designed DIY Chrome Delete Kits. By following these detailed steps and leveraging the resources provided on the TESBROS website, you can achieve a professional look right at home.

    Gather Your Tools

    While TESBROS Chrome Delete Kits include the essential pre-cut vinyl pieces and tools like a squeegee, you may need a few additional items to ensure a smooth application:

    • Microfiber cloth: For gentle, streak-free cleaning.
    • Isopropyl alcohol: To remove grease, dirt, and debris from application surfaces.
    • Heat gun or hair dryer: Helps soften the vinyl for easier application around curved or uneven surfaces, improving adhesion.

    Clean The Surface

    A clean surface is critical for proper adhesion and a flawless finish. Follow these steps for the best results:

    • Use a microfiber cloth to wipe down the areas where the vinyl will be applied.
    • Apply isopropyl alcohol to remove any residual grease, dirt, or contaminants.
    • Let the surface dry completely before proceeding.

    Pro Tip: Avoid applying the kit in dusty or windy environments to minimize contamination.

    Position The Vinyl

    TESBROS kits come with precision-cut vinyl pieces tailored to your Tesla model, ensuring a perfect fit. Here’s how to position them correctly:

    • Peel back a small portion of the adhesive backing.
    • Carefully align the vinyl piece over the chrome trim, starting at one edge.
    • Use light pressure to temporarily hold it in place while adjusting alignment.

    Take your time during this step—proper positioning is key to achieving a seamless look. Check out TESBROS' video tutorials for guidance on aligning the vinyl perfectly.
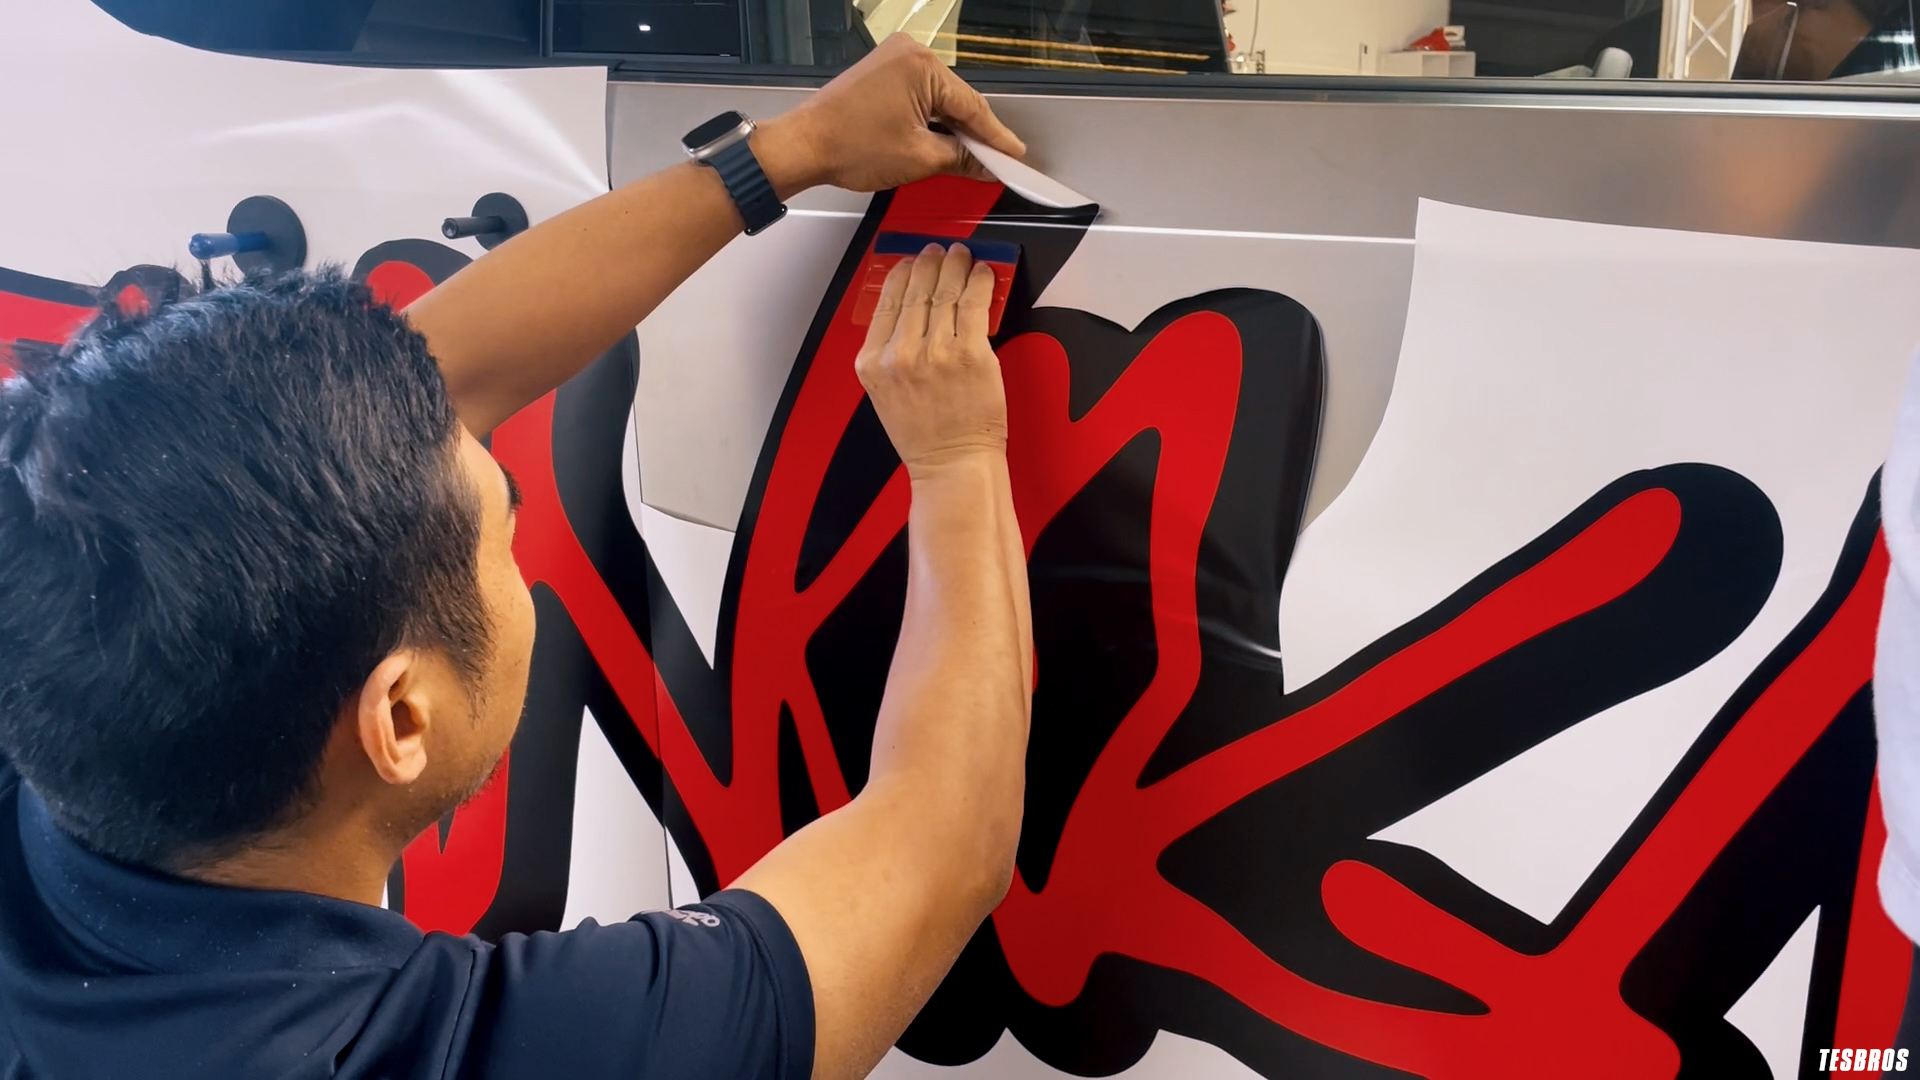
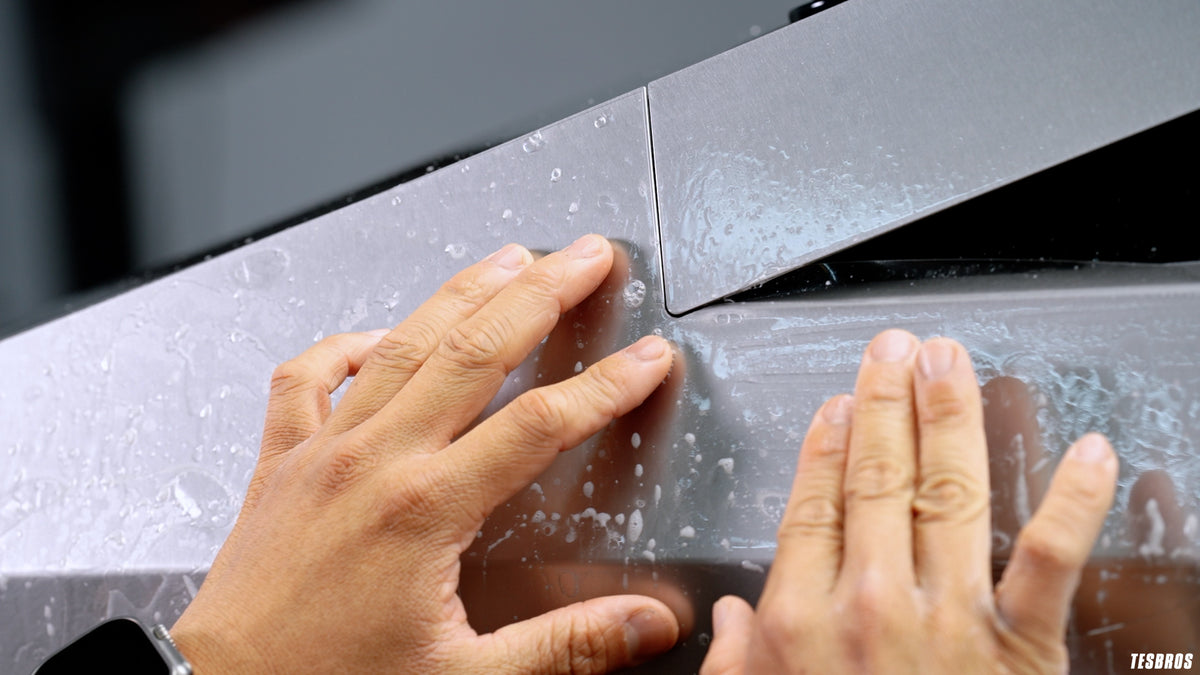
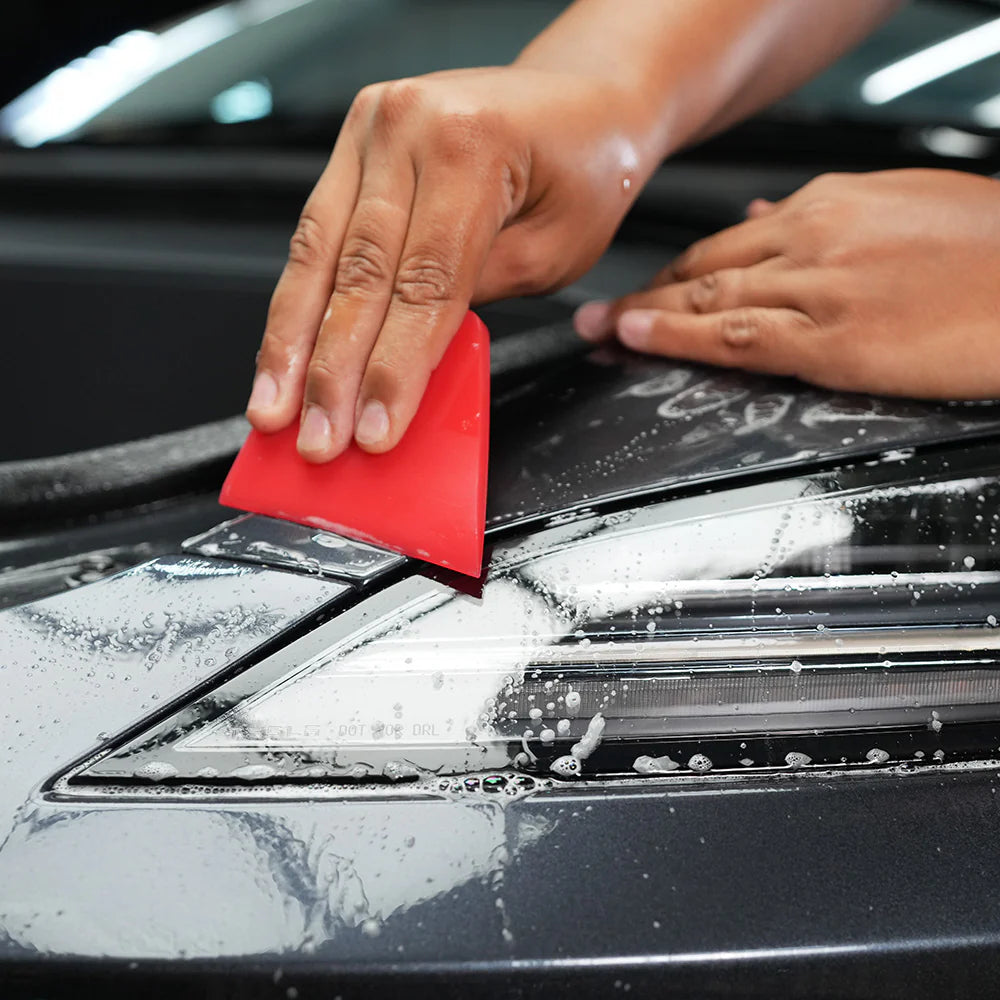
    Apply The Vinyl

    Once the vinyl is positioned, it’s time to secure it in place:

    • Gradually peel away the backing while pressing the vinyl onto the surface.
    • Use the provided squeegee to smooth out air bubbles and wrinkles as you go.
    • Work slowly, applying even pressure for a snug, uniform fit.

    Pro Tip: Start at one end and work your way to the other, ensuring each section is smooth and bubble-free before moving on.

    Secure The Edges

    To achieve a polished, professional look, you’ll need to address curved or irregular areas:

    • Use a heat gun or hair dryer to warm the vinyl gently. This softens the material, making it more pliable and easier to conform to complex shapes.
    • Press the edges firmly into place, using the squeegee or your fingers to ensure they adhere properly.

    Pro Tip: Be cautious not to overheat the vinyl, as excessive heat can cause it to stretch or warp. TESBROS' resources include expert tips for handling tricky areas.

    Let It Set

    Patience is essential for long-lasting results. Allow the adhesive to cure before subjecting the car to washing, rain, or direct sunlight:

    • Leave the car in a controlled environment for at least 12-24 hours after application.
    • Avoid exposing the vinyl to extreme temperatures or moisture during this time.

    Pro Tip: Refer to TESBROS' instructional videos for post-installation care tips to maximize durability.

    Maintenance Tips For Your Tesla’s Chrome Trim

    Once your DIY chrome delete kit is successfully applied, proper maintenance is essential to keep the trim looking sharp and preserve its longevity. Follow these tips to ensure your Tesla’s chrome accents stay in pristine condition:

    Regular Cleaning

    Clean the chrome trim regularly to prevent dirt, grime, and water spots from dulling its shine. Use a mild car soap and water, followed by a soft microfiber cloth to dry the surface.

    Avoid Harsh Chemicals

    Steer clear of abrasive cleaners or solvents that could damage the chrome or adhesive. Stick to automotive-safe cleaning products designed for delicate finishes.

    Protect Against Scratches

    Be cautious when washing your Tesla. Avoid using rough sponges or brushes that could scratch the chrome trim. A microfiber mitt is ideal for gentle cleaning.

    Apply A Protective Coating

    Consider using a protective wax or sealant specifically formulated for chrome. This adds a barrier against environmental contaminants and enhances the shine.

    Inspect For Damage

    Periodically check the chrome trim for peeling, bubbling, or scratches. Address any issues promptly to prevent further deterioration or water damage to the adhesive.

    Handle With Care

    Be mindful when opening doors or handling areas with chrome accents. Avoid actions that could cause chips or dents, especially around the edges.

    Avoid High-Pressure Washing

    When washing your Tesla, avoid directing high-pressure water streams at the chrome trim, as it may weaken the adhesive over time.

    Where To Buy The Best DIY Chrome Delete Kits For Teslas

    Looking for the perfect DIY chrome delete kit to give your Tesla a sleek, professional finish? TESBROS is your ultimate destination. Known for our high-quality, durable, and easy-to-use chrome delete kits, TESBROS ensures that your Tesla looks its best without the hassle. Visit TESBROS today to find the ideal kit for your model!

    Read also: 

    A chrome delete kit allows you to cover the chrome accents on your Tesla with vinyl, giving the car a sleek, modern look. It's popular for Teslas because it complements their minimalist design and offers an affordable way to personalize the vehicle.

    The installation process typically takes 2-4 hours, depending on the complexity of the kit and your experience level. Taking your time ensures a professional-looking result.

    No, high-quality kits like those from TESBROS use an automotive-grade adhesive that won’t damage the original chrome or paint. The vinyl is removable and leaves no residue.

    When properly installed and maintained, a chrome delete kit can last 3-5 years or more. Premium materials, like those used in TESBROS kits, resist fading, peeling, and cracking in various weather conditions.

    Most kits include the necessary tools, such as a squeegee and pre-cut vinyl. Additional tools like a microfiber cloth, isopropyl alcohol, and a heat gun or hair dryer may enhance the installation process.

    Yes, DIY chrome delete kits are reversible. The vinyl can be removed easily without damaging the original surface, allowing you to revert to the factory look or try a different customization.